How to take better fungi Photos
Stunning fungi photos result from preparing the scene, getting up close or down to fungi level, keeping the camera still, getting enough light on the subject and creating a soft focus background. Here are some tips for achieving each requirement.
|
Groom your fungi
Mushrooms will usually be surrounded with other vegetation, sticks, leaves, stones and so on. Their bases will often be obscured and they will often have soil remainders on the cap. So before you get your camera out, do some careful grooming. Check again for distractions through your view finder. Tiny stalks and stems can appear huge when you are in macro mode and are especially distracting because they disect the image at oblique angles. 
Distractions also make focusing more difficult, especially if you are auto focusing. Also make sure that any basal features are visible. This might require clearing vegetation around the base and then replacing enough to give a natural look without obscuring any mycial fuzz, volva or other basal features. Moss for instance can be removed and strategically replaced. Remember however to leave things pretty much as you found them. Get down to fungi level Most good mushroom photos of ground dwelling fungi are taken from ground level. From the ground you can see textures, shapes and colors of both the top and underside of the mushroom. Because fungi are so close to the ground it is often easier to photograph fungi with Digital compact cameras than large SLR bodies. From ground level you can get close enough for macro shots and the fungus will appear tall and dramatic like the one in our header image. From the ground it is easier to keep your camera completely still by using a mini tripod, bean bag or gorilla pod. Get the right light
ln general it is better to set your exposure to capture highlight details than shadowed areas because overexposed highlights can't be fixed in later processing. That said, in photographing fungi, lack of light is often the problem. Here are some ways to give your mushroom the right sort of light and enough light to ensure that the whole of it will be in focus. Use a slow shutter speed By slowing down the time your shutter is open you let in more light. Shutter speed can even be slowed enough to photograph bio-luminescent fungi that glow in the dark. The mushroom will stay still but a slow shutter speed leaves more scope for loss of focus due to camera movement. So for success with this approach you will need a method to keep the camera perfectly still. Use a light Reflector
Using a white card or a card covered with aluminium foil to reflect surrounding light can, help providing you can angle the card and keep it out of the field of view. Use on-camera flash The following two images of Polyporus Arcularius fungi demonstrate the difference in the distance that can be kept in focus without and with a flash. 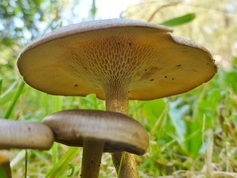
Taken without flash there is a very small depth of field. Only a very small distance within the fungus is in focus.
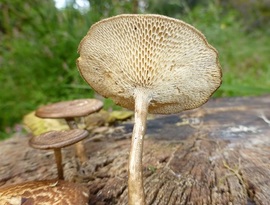 Taken with flash the whole mushroom is focused but the background is blurred because its such a close-up image. Taken with flash the whole mushroom is focused but the background is blurred because its such a close-up image.
On camera flash will often help but can be hard to use at very close distance because it may burn out highlights and create harsh shadows.
Correctly used, flash can help bring out colors and lighten dark areas but a flash that is too close to the subject can produce unnatural colours. This is especially relevant if your mushroom subject is very small. For best results, you need to get in close and ensure there's enough light on the mushroom's underside. To get close, try setting the flash to minus 2 stops and expose normally or at minus1/3 f-stop. This prevents over-exposure of the bright areas with the flash adding a little extra light where it's needed. The shutter speed will also be lower so camera stabilization is also important. Flash also enables you to get the right exposure when you are looking up to a mushroom with a bright Iight sky background.
0ff-camera flash allows you to control the direction of light and keeps the flash distant enough to avoid burning out parts of the image. This is achievable through connecting a cord between the camera's hot shoe and an external flash, which would probably also reflect off a white card to get bright but soft lighting.
If your camera does not have a hot shoe you could use a flash slave unit with wireless sycronisation. Auxiliary flash with slave (optional)
A small flash with slave unit for wireless synchronization can be quite useful for adding extra light for exposure and some side or back light for a more natural look. The problem you can run into is that most digital cameras have a pre flash for red-eye that can fire the slave prematurely creating the light burst too soon. You can shut off the red-eye flash setting on most cameras. It's best to leave it shut off for photographing mushrooms when using auxiliary flash. You may find that you can resurrect an older flash and slave that way. An even more sophisticated solution for flat lighting is Sunpak FP-38 E-Flash, On-camera Flat-Light Kit with Mounting Bracket and Built in Slave Your mini tripod or a beanbag can come in handy for supporting the auxiliary flash. You will need to experiment with different setups to get the kind of look you will like. |
Creating a sharp image Having enough light on your mushroom greatly aids image sharpness and clarity. Here are some other keys to creating sharp images. Shoot from further away
More of your shot is focused when you take it from further away. If you have a high megapixal camera you can crop the image later. Narrow the lense aperture
Sharpness varies much more by f-stop (aperture) than by camera brand. Most lenses perform with optimal sharpness and contrast in the f-4.5 to f-11 range. Wide F-4.5 and 5.6 apertures make for a very narrow distance through which the image will be sharp especially if the camera is very close to your mushroom target. Narrowing the lense aperture means less light through the lense so you will need a longer exposure, slower shutter speed and better camera stabilization. Stabilize your camera
Image stabilization on modem digital cameras will help somewhat. Perfectly sharp photos usually require a means of stabiIizing your camera further, especially if photographing fungi in low light. A gorilla pod screws to your camera base and its three flexible legs can be twisted to any configuration to provide stillness and flexibility of camera angle. With use the top ball an snap away from its cup. This can be a nuisance but leaves a cap attached to the camera that will keep it just off the ground. A home-made mini bean bag is a great way to keep your camera still. Just loosely fiIl a portion of a pantyhose with quinoa or some other small granule that don't become dusty and tie it off. You can even carry it loosIy tied over your belt. Highlight the fungi with a soft focus background
Use a distant background The least technical way to do this is to position your fungi so that the background is a quite distant. This is easily achieved for fungi that grow on small branches, leaves or twigs by placing the branch on something high but well away from vegetation. The photo of Crepidotus Eucalypti fungi, below was taken with this technique. 
Get close to the fungi This makes backgrounds appear distant even when are not. 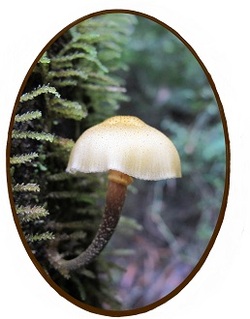
Getting closer to the fungi you are photographing also makes it's background more blurry as shown in this photo. Often times however, the depth of field at close range is not great enough for the whole fungus to be in focus. Getting close by zooming makes this problem worse because the greater the lens focal length the less depth of focus there will be. Zooming also makes it harder to get sharp images because it is more sensitive to camera shake. Use a wide aperture
A widely open lense reduces the distance over which the photo will be focused. The smaller the F stop value, the wider open your lense will be. This enables you to have the fungi in focus against a blurred background. 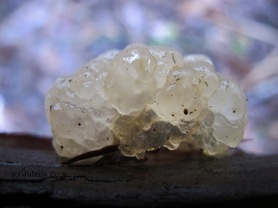
In low light a camera on auto mode will use wide aperture to gain sufficient light. The above photo of Tremella globuformis is an example of using low light to blur the background of a fungi photograph.
Use Your Zoom
In a zoomed photo taken from further away the mushroom takes up more space in the frame which can defocus the background. You may need to compensate for extra camera shake. For Canon Powershot cameras and some other brands, you can get CHDK firmware files. CHDK files enhance the firmware functions of your present camera. Small files are installed in the root directory of your camera's memory card and can be enabled when powering your camera on. Your camera's original firmware is not altered. CHDK is always evolving and firmware versions are available for may functions. They can override and expand your shutter speed selections, f-stop choices, ISO, and have depth of field and color map graphics. Most all versions allow you to shoot RAW files. There are special builds for fast motion, stereoscopic, and other specialized applications. They can be downloaded free from the internet. Find information at http://chdk.wikia.com/
|
|

Browse fungi Design gifts
|